As promised!

(Please keep in mind that this is just a quick little tutorial to show you how I constructed the blocks for my modified bento box quilt. There are tutorials you can purchase for the standard bento box quilt – I’ve never seen the pattern, and I really have no idea how the blocks are constructed in the pattern. I’m led to believe that this is not the same method, so I feel ok posting it here…)
The measurements provided are what I used for my quilt, but the technique would be the same if you decided to change the size of your strips, or the final size of your blocks. Using this method you’ll construct large blocks which you’ll then cut into quarters. These measurements produce a block that is 16″ square (or 15.5″ square, if you’re like me and aren’t as precise!) which is then cut into four blocks that are 8″ square (or 7.75″ in my case!) Please note that 1/4″ seam allowances are used.
All that being said, let’s get started! First off, select a bunch of fabrics you’d like to use. I probably used around 10-15 prints and about 5 solids for my version, but this is totally up to you!
Select a fabric for the center of your block and cut this to 6″ square. Then select the fabric for the second ring of the square. This fabric will be cut to 1 1/2″ wide. You need 2 pieces 1.5″ x 6″ and 2 pieces 1.5″ x 8″.

Sew the shorter strips to the opposite sides of the square. Press. (I press mine to one side, but you could certainly press your seams open if you’d rather). Repeat this process for the second set of opposing strips. Press again.

The next ring is 2″ wide, and for this ring you’ll need 2 strips that are 2″ x 8″ and 2 strips that are 2″ x 11″. Repeat the process to sew the shorter strips to opposing sides, and press. Repeat with the next set of opposing strips.

The third ring is 1.25″ wide, and for this ring you’ll need 2 strips that are 1.25″ x 11″ and 2 that are 1.25″ x 12.5″. Repeat steps from above.

The last ring is 2.25″ wide. For this one you’ll need 2 strips 2.25″ x 12.5″ and 2 that are 2.25 x 16″.

In theory, this should result in a block that is 16″ square. (this assumes that you have perfect 1/4″ seams and that your ironing skills are spot on!). In reality, my blocks always ended up just shy of 16″ square, so instead of worrying about it, I opted to trim them down to 15.5″ square. I just eyeballed it and trimmed a bit from each side, but in order to make sure everything lines up correctly, you’ll should mark the center of the block and measure out 7.75″ from the center on each side and use this as a trim line.

Once your block is square, you can simply cut it into four equal pieces. In my example, with a 15.5″ block, I measured in 7.75″ and cut the block in half and then repeated for the other side.

You’ll now have four equal blocks that are 7.75″ square. (or 8″ square if your sewing and ironing skills are better than mine!)

Repeat the process for constructing these blocks, changing up your fabrics and the placements of those fabrics and then rearrange the quarter squares into full blocks.
Sew your blocks back together, and then sew all the large blocks together into a quilt top! For the quilt I made, I made a total of 12 full blocks, which resulted in a smallish quilt, measuring about 40″ x 54″ after washing.
Enjoy! And as always, feel free to comment with any questions or if you spot any errors!

Oh, and an aside – I made this block for the tutorial, but don’t have any plans for it… if anyone’s interested in these 4 quarter blocks, leave a comment. If more than one person is interested, I’ll let random.org pick someone tomorrow!
Edited to add: The winner has been selected – Congrats to Jessica Brown!
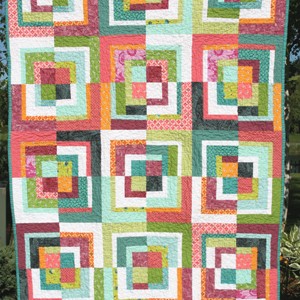 It’s finished! A modified bento box quilt.
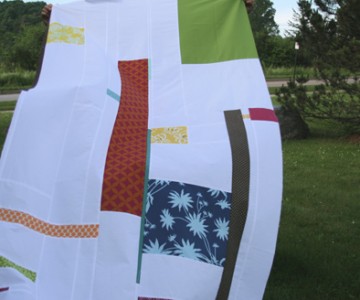 the back that inspired the front…


Pingback: Elly Sha Designs » Blog Archive » Sunny in the tropics
Pingback: It’s finished! A modified bento box quilt. – Film in the Fridge
Pingback: Quilt Top for a Cause « Fresh Lemons Modern Quilts
Pingback: Quilt Top for a Cause — Fresh Lemons Modern Quilts
Pingback: Bits and Pieces | Homemade Pineapple Marshmallows's Blog
Pingback: Meeting Minutes for September 29, 2010 « Spokane Modern Quilt Guild
Pingback: Having Said That… — Whipstitch
Pingback: Pieced Quilts – Free Pattern | Colorful Creative Ideas
Pingback: Scrap quilt « outros retalhos
Pingback: Bento Box Quilt |
Pingback: Baby Quilt « casey&alicia
Pingback: Giveaway winner and a spring sale « Mad About Patchwork
Pingback: Quilting Bee Catch Up – Patchwork Palace
Pingback: >Bento boxes! « scrambled meggs
Pingback: » WIP Wednesday Play Crafts
Pingback: Autumn To-Do List
Pingback: Modified Bento Box Baby Quilt | better off thread…
Pingback: WIP Wednesday 1.16.13 ~ Bee Boppin’ Along | With Arms Open Wide
Pingback: Free Sewing Patterns: Quilting | married to a bmw
Pingback: Quilts in Progress | Postmodern Craft
Pingback: A Quilt for My Nephew | Postmodern Craft
Pingback: do. Good Stitches – May | Jaclyn Quilts
Pingback: August Block Challenge – Modified Bento Box » Ventura Modern Quilt Guild
Pingback: Finish: Modified Bento Box | Play Crafts
Pingback: Bee Bento Box Block | Ants to Sugar – Fabric. Quilting. Some modern. Some traditional.
Pingback: Put a Ring On It | Riddle and Whimsy
Pingback: Ever worry your quilt is going to give someone a migraine?
Pingback: FAL Q3
Pingback: FAL 4th Quarter Goals | iamacraftykat
Pingback: FAL Q3 | iamacraftykat
Pingback: FITF: intersection | Film in the Fridge
Pingback: frantic - i need the "new" bento box quilt pattern can anyone help?
Pingback: what i've been up to .. WIP Wednesday | Mad About Patchwork
Pingback: On The Go Quilting » Friday Finds April 3
Pingback: Dissertation Quilt | as designed
Pingback: great minds think alike! | wips & tuts
Pingback: Quarter Log Cabin Mini Quilt {Tutorial} | Quilting Jetgirl
Pingback: Black and White Bento Box Finish | LoGo Quilts
Pingback: Auf zum Picknick! | Atelier Clementine
Pingback: Dog Gone Cute! – Just Jude Designs
Pingback: Bento Boxes – Issabellas Quilts