a string quilt block tutorial – paper pieced method

I’m so blown away by all the wonderful comments on my string quilt, now aptly named ‘Kaleidoscope’ (many thanks to Kerri who was the first to suggest it, followed by 9 others of you who had the same thought!) I think it’s just perfect.

And now, a quick tutorial – I had a few requests for a tutorial on making this type of quilt, so I figured I’d oblige (it’s the least I can do, right?). This shows the paper piecing method, which is my preferred method.

To start, you’ll want to decide on the size of your blocks. For the Kaleidoscope quilt, my blocks were 11″ square. In this tutorial, I’m using 7″ square blocks. I use cheap copy paper, but you could use anything you have on hand – I’ve heard pages from phone books work! – just as long as it’s not a heavyweight paper.

Cut squares of your desired size from the copy paper and set aside.

Decide on your fabrics and cut strips of a variety of widths. I cut strips of 1″ – 2.5″. I like the way it looks with a variety of widths, but you could also cut strips all the same width if you’d prefer. Set these aside.

fabric-strips1

I wanted to have a small strip of white separate the squares in my quilt, so I cut 1″ strips of a solid white fabric. You could opt for any other solid color – I used green in this baby quilt, or you could use one patterned fabric to tie everything together, or you could skip it completely.

Next we’ll temporarily attach the white strips to the paper squares. With the fabric right side up, lay the strip diagonally on the block. I use a little glue from a glue stick to dab on the back of the fabric strip so it will stick to the paper. You want to make sure that each strip is centered on the diagonal so that your strips will line up with you sew the blocks together. I eyeball mine (’cause I’m lazy!) but you may want to use a ruler and draw a pencil line through the diagonal to help with placement.

paper-squares-with-strips

Now you can start sewing on your fabric strips! The first strip should be long enough to cover the section of paper right next to the piece glued on the diagonal. You’ll lay your first strip right side down on top of the strip glued to the block.

attach-first-strip

(please ignore my wrinkly fabric! I’m not much for ironing!)

Align the edges and sew with a 1/4″ seam allowance. Very important: be sure to reduce your stitch length! This will allow you to easily remove the paper from the back later. My machine is typically set at 2.5 – I’ve found that reducing it to 1.5 works well.

sew-strip

Sew along this edge (right through the paper), then iron open with a dry iron. (some may want to skip the ironing, and just finger press – that’s up to you).

first-strip-sewn

Repeat this process, aligning another strip to the strip you just attached, again, right sides together.

attach-second-stri

Iron open and repeat until you’ve covered the entire paper square. It will look something like this.

pre-trimmed-block

Now you can flip the square over so you can see the paper square on the back. Using your clear ruler and rotary cutter, trim the excess fabric, using the paper square as a guide.

trim-block

And now you’ve completed your first block! I leave the paper on my blocks until I have them all completed.

finished-block

Repeat for all your paper squares. Then you can arrange them as you like -

four-blocks

When you have your blocks completed, you’ll want to remove the paper from the back. If you’ve reduced the stitch length, the paper should appear almost perferated. I fold the paper along the stitch line and then tear away.

Sew your blocks together and admire your lovely quilt top!

This entry was posted in Tutorials and tagged , , . Bookmark the permalink.

115 Responses to a string quilt block tutorial – paper pieced method

  1. 1
    Mal* says:

    Thanks for the tutorial! Bookmarky bookmarky. I really think that white stripe in the middle is what makes your quilt great. I mentioned before that I tend to not like string quilts but your Kaleidoscope is just gorgeous.

  2. 2
    Kristy says:

    Love your color combinations. What a great tutorial! I wondered how paper piecing was done. Thanks =)

  3. 3

    I agree with Mal. The white stripe is like the whipped cream on top of the banana split–perfect. Thanks for the tutorial.

  4. 4
    Holly says:

    Thank you so much for this tutorial, I never understood what the point of the paper piecing was. It really makes everything line up I see. I really want to give this a try! Your Kaleidoscope quilt is just lovely, like all your wonderful quilts! Did you ever think about starting your own Etsy shop?! You’re amazing handmades would be a sure hit! =D

  5. 5
    Sue says:

    Thanks for the tutotial, I’ve heard of using muslin on the back, like this better. Love your work!

  6. 6
  7. 7
    heather says:

    Thanks for that!! Great job. I think I’m going to give this a try!:)

  8. 8
    Jenny says:

    Thank you thank you thank you! I have looked at every tutorial I could find and paper piecing never clicked until yours. Great pictures, too, as usual :) And Kaleidoscope couldn’t be a more perfect name!

  9. 9
    Leslie says:

    Thanks so much for the tutorial! I can’t wait to try it.

  10. 10
    Rachel says:

    Thanks for the tutorial! I was wondering why people use this method. I need all the help I can get lining things up!

  11. 11
    Ann-Marie says:

    oh yeah!!!
    I love alllllllll your quilts, and this one is beyond cool!
    thanks for posting this!!

  12. 12
    aimee says:

    Thanks for the tutorial! I couldn’t work out how you perfectly centered the white… I love your quilt – beautiful!!!

  13. 13
    willy-nilly says:

    Wondering about the white too? Amazing quilt and another to add to the list.

  14. 14

    Thanx for this. I’m thinking I might actually make one of these because it’s kinda mindless sewing. And I loved reading your directions…I think we’re similar “relaxed” quilters. :)

  15. 15
    Whitney says:

    I was surprised to find myself reading this intently like I might actually do it…and now I’m surprised to be admitting this to you! Impressed that you may have converted me? Well, you should be.

  16. 16
    Sara says:

    Oh thank you! I’ve been sitting here for days wondering, how did she do that?

    And now I know! Thanks again!!

  17. 17
    Beth says:

    I was also curious to know how you made something so beautiful – thanks for sharing your technique. Your directions are so clear and straightforward. I may have to give something like this a try. I also really like the idea of sewing with paper!

  18. 18
    Sonja says:

    Thank you soooo much for your tuto!!!

  19. 19
    Casey says:

    thank you for the tutorial!!

  20. 20
    Leigh says:

    beautiful! And it makes so much sense! I KNEW I was saving my scraps from some good reason…

  21. 21
    hannita says:

    Can I just say that I have read about 5 tutorials on how to do this and this is the very first time it made any sense? Thanks for that!

  22. 22
    Kate Dixon says:

    Thank you for the tutorial. Your blocks love gorgeous, they colourswork perfectly together.

  23. 23
    Rachel says:

    I like this one, very pretty! I’m all about cramming as many different fabrics in as I can, I can never discriminate! I’ll be linking.

  24. 24
    Ellen says:

    Thank you Thank you! An easy tutorial for a great scrap user!

  25. 25
    Allison says:

    Thank you for the tutorial, I love love love this quilt. Its on my quilting to do list next. :)

  26. 26
    AntipodeanJulie says:

    I love paper piecing and do most of my patching / quilt tops this way.

    I also love reading all the different ways people use it and explain it.

    One thing I’ve always found useful not matter which pattern is to use a bigger size needle in the sewing machine. It makes the paper holes bigger, increasing the perforations and gives more wriggle room, letting the papers be removed easier (and therefore not putting the stitches under any stress). I think I read it years ago in a magazine (way before all these blogs!) tried it and found it worked!!

    I love your white strip and am eager to go sew together a jelly roll incorporating the dividing stripe now. Thank!!

  27. 27
    Kelly says:

    Thank you for the tutorial!!
    I can’t wait to try this out, when i have enough scraps that is!

  28. 28
    Sophia says:

    This is wonderful quilt! Thank you for the tutorial!!!

  29. 29
    elektra says:

    Thank you so much for this tutorial! I’ll try this method this evening. Your Kaleidoscope quilt looks so modern and fresh – just great!

  30. 30
    Zarah says:

    Stupid question… what is the benefit of paper piecing vs. just sewing the strips together?

    • 31
      admin says:

      The paper piecing provides a foundation and can help stabilize fabrics. I find it helpful because there’s no need to measure your strips – you already know the area you need to cover. It also allows for more precision, especially if you’re creating a quilt similar to the one I’ve shown that has one constant color running through it – by using the paper, you know exactly where the fabric needs to end up. That being said, it certainly is possible to just sew the strips together… I happen to really like the paper piecing though!

  31. 32
    Jackie says:

    Thanks for the tutorial! I think I see a string baby quilt in my future.

  32. 33
    vanessa says:

    muito lindoooooo
    parabénssss

  33. 34
    Jenna Z says:

    When I strip quilt, I use muslin squares instead of paper. No paper to tediously rip off and you get the same stability and helpful strip placement guide. :)

  34. Pingback: Patchwork Swap « Terri’s Notebook

  35. 35
    joanie says:

    This is beautiful, so inspiring. Apart from the central white strip, it looks like there’s no need to be particular about which fabrics you use, just throw them together – I love that!

  36. Pingback: Make something - Quilts | Things to Make and Do

  37. 36
    amandajean says:

    thanks for the tutorial! i’m hoping to start one of these today!

  38. 37
    Kerry says:

    What a great way to use up scraps! Thanks for the tutorial.

  39. 38

    The quilt is beautiful, and this paper piecing technique looks like a lot of fun! I am thinking this will be my next quilt, thanks so much for the tutorial! I just recently found your blog, I am really enjoying it : D

  40. 39
    Whitney says:

    Love it!! I started my first quilt when I was in my early teens and it was a paper pieced string quilt…now I’m 22 and still have yet to bind it…need to get on that. Your photos are beautiful and inspired me to dig out my old quilt and finish it :)

  41. Pingback: pillows to match a quilt - Film In The Fridge

  42. 40
    Erin says:

    Thank you for the tutorial! I’m going to make one.

  43. 41
    delaneysduds says:

    so cool! I will definitely use this method!

  44. Pingback: Unveiling.. « Thursday Rendezvous

  45. 42

    Thanks so much for this tutorial — I used it for a very small project to test it out because I wanted to so quickly!
    Blogged: http://thursdayrendezvous.wordpress.com/2009/05/09/unveiling/

    Thanks!

  46. Pingback: Weekly Roundup | turning*turning

  47. 43
    Susan says:

    Love it, and I had to try it. I’m so pleased with your tutorial, and I’m happy with how my pillow turned out! Thanks!

  48. Pingback: Hi There! « Annieshouse

  49. 44
    Sandy says:

    Nice tutorial. Although I have to admit I would never use paper …. it’s so ugh to remove and can cause the block to get wonky. You can sprits the paper, wait a minute and then remove. I just use thin fabric … I’ve made a ton of string quilts. Love your blog … I want to give the bento idea a try. Thanks.

  50. Pingback: X’s and O’s « Lila Mae Quilts

  51. 45
    jackie says:

    Hi I used pages from an old telephone book, very thin and easy to remove, fun quilt, great results without hard thinking about color! thanks

  52. Pingback: Craft-A-Little » Blog Archive » weekend quilting

  53. 46
    Pat says:

    Hi All, I love making these string-quilt blocks-sometimes they are called “sew & flip” blocks. I have made quite a few quilts this way–I use squares of bleached or unbleached muslin to sew the strips onto. that way I don’t have to remove anything, and it works well for me. It also gives a little more support so I can use a thinner batting. thank you very much for all your sites, I love learning new ways to do things.

  54. 47

    Hi There! I just wanted to say I love this quilt! I’m currently working on it (as my first quilt ever!) I linked back to this post on my blog (thedabblingcrafter.blogspot.com). Keep up the beautiful quilts!

  55. Pingback: · String Quilt Pillow

  56. 48

    Paper piecing never made sense to me in any of the tuts I’ve read. I thought it was a waste of time and something I’d never want to do.

    HOWEVER – this tutorial changed my mind forever! I love the idea of knowing exactly where to cut your strips off on the back and the easy way you explained this. I cannot wait to go try it out! Thanks for the inspiration and the simple illustrations. :)

  57. 49
    Rachel says:

    Hi Ashley,
    I am using your tutorial to make a string quilt. It is so easy! Thanks for the great instructions. I posted the first few blocks on my blog.
    Rachel

  58. 50
    Alicia says:

    Thank you for the tutorial! I saw your Kaleidiscope quilt and instantly fell in love with it. I started making one last night and will let you know when I finish it. Thanks for sharing your expertise!

  59. Pingback: The QuiltWoman.com Blog » Blog Archive » A String Quilt

  60. 51
    HeatherL says:

    Thanks so much for the fantastic tute! I wanted to try paper piecing for a complex project but thought I’d never find a good explanation. The other projects I’ve found online have been strange animal shapes I am quite sure I’ll never do….this is fun, purposeful, and creates a beautiful result!

  61. Pingback: How many projects are floating around in your head right now? «

  62. 52
    Sharon Young says:

    Thanks for the tutorial! Now that I have actually seen how to do it, I can’t wait to work on my stash! Seeing it in pictures makes paper piecing seem much easier to do than I thought!

  63. 53
    Julie says:

    Bookmarked! Thanks for the tutorial. I am going to start on mine today.

  64. Pingback: The Beginning of a String Quilt «

  65. 54
    Deb in AZ says:

    My niece sent me one of those page a day calendars for C-mas. I’ve been saving each page as it is torn off daily. Now I know what to do with all the pages- use them for a string quilt foundation! Each page is about 6″ square, perfect size for my shorter scraps. With 365 pages there will be a couple nice large throw string quilts in the future! (One for my niece too).
    Thanks for the tut!

  66. 55
    Leanne says:

    Thanks for that I have not visited you before but love the quilt. Thanks for sharing.

  67. 56
    Betty says:

    Thanks so much for this tutorial. I’m almost finished with my first baby sized one and I love the pretty design! I’m using muslin instead of paper. It’s adding a nice weight to the cotton fabrics. I live in a hot climate so I always just use flannel on the backs of my quilts and no batting. The muslin is giving it just that extra weight that it needs. Thanks very much for these easy to follow instructions!

  68. 57
    deb says:

    When I first started quilting -27 years ago- we called this pattern “brain dead” quilting because it could be worked on those evening when life was so challenging that you couldn’t think – you were mentally brain dead.

    It’s a great ongoing project.. and one of my favorite string quilts.

    Putting this one in my list for a future BlogHer post.

  69. Pingback: For The Journey » Blog Archive » Quilting Bee Catchup

  70. 58
    Kristi says:

    Your Kaleidoscope quilt is one of my favorite quilts ever–I love how the thin strips of white make the colors pop. Thanks for the fab tutorial. I can’t wait to try it!

  71. Pingback: Meet Maddie · Quilting @ CraftGossip

  72. Pingback: The String Quilt is Complete! « Fresh Lemons

  73. Pingback: So Many Quilts…So Little Time « Wholesome Womanhood

  74. 59
  75. Pingback: hopefully something rhetorical » Blog Archive » Making my way back…

  76. Pingback: :: One Down, One to Go:: « Willy-Nilly

  77. Pingback: :: One Down, One to Go:: « SEW KATIE DID

  78. 60
    Gail says:

    My bee group’s 2010 block exchange is a string block, which is a new technique for some. May I please print and distribute your excellent tutorial for our bee members?

  79. 61
    christine says:

    oh my… thanks for this. you just made a beginners day.

  80. Pingback: new flickr group and a little giveaway – Film In The Fridge

  81. 62
    Anita says:

    I am beginner and have not made a quilt yet but did make an “Ohio Star” block. I would like to try this but have a question. What about frayed edges? Are the strips turned under?

  82. 63
    elisa hernandez says:

    Wow, thanks so much for walking me through this. I will be trying this with my mom…were going to have a great time.

  83. Pingback: Tutorial Tuesday: Strung out! « A Quilt A Day

  84. 64
    Katie Trott says:

    love this! I was wondering why there was a white scrap of fabric down the middle – now that it’s finished, I see! I’m guessing that this is the “rope” part. I just love finding a way to use my scraps :D

  85. Pingback: an Anna Maria Horner string quilt, in voile – Film in the Fridge

  86. 65
    Meg says:

    Ashley, I know I’m late to the party on these, but I finally tried out a few of these for a mini swap this month. Oh gosh, these are addictive!!! And is it just me, or do strings seem to multiply instead of decrease, the more of these blocks you make?

  87. 66
    Mallory says:

    These are beautiful – thank you so much for sharing this tutorial!

  88. Pingback: a colorful (and slightly wonky) string quilt top – Film in the Fridge

  89. Pingback: by a string « little cumulus

  90. 67
    maureen wynne says:

    I just love this technique. Have made several using scraps of fabric given to me by others and also my own. After showing my friends what I made I don’t think they will be handing me their scraps anymore. I also used a black and a cream side by side in the centre. this gives a lovely double diamond, light and dark effect when finished. I love it.

  91. Pingback: Work in Progress – Colorbrick Quilt & Tutorial « Euphoria for Green Mamas

  92. Pingback: String Quilt – bias

  93. Pingback: Ignorance is Bliss…

  94. 68
    Minette says:

    Thanks , this is a great tutorial!

  95. Pingback: Work in Progress – Colorbrick Quilt & Tutorial « Stitched in Color

  96. 69
    Ladypennyjane says:

    I made a quilt as you go reversible string quilt, where instead of piecing onto paper you cut squares of batting instead and sewed strips on both sides at the same time, which had the same effect but you have to be careful with the colour choices as double sided these babies can be a bit much!

  97. Pingback: First week back to work « Something Cheeky

  98. Pingback: another string quilt… completed! – Film in the Fridge

  99. Pingback: a wonderfully wonky string quilt – Film in the Fridge

  100. Pingback: This I want to make: « Nurse Ratchknit Makes Things

  101. Pingback: Spring Green Strings « Wedding Dress Blue

  102. Pingback: pretendingsanity » some links for later

  103. Pingback: Graduation confetti « BloodStudios.com

  104. 70
    Shara says:

    I have been saving my left over strips and bits for a while, now I have a great pattern to use them on thanks to your tutorial! I plan on whipping up some of these quilts for my nieces and newphews for Christmas this year!

  105. 71
    Linda says:

    Thank you for your very clear Tutorial. I have just completed a String Quilt, following your instructions but using squares cut from an old white cotton nightie and pillowcase for the base. Thrilled with the result which you can find on Flickr under Koshka2.

  106. Pingback: Little Bit Funky Quilt Raffle helping others : Fabulous Won

  107. Pingback: how do you store your fabric scraps? – Film in the Fridge

  108. Pingback: August Kits are in the Mail « Terri’s Notebook

  109. Pingback: a flea market fancy lattice quilt – Film in the Fridge

  110. Pingback: Kaleidoscope – a colorful string quilt
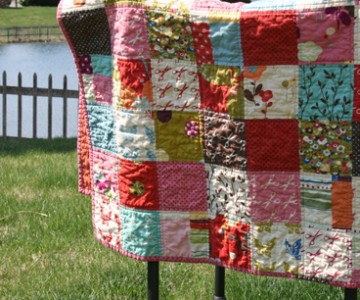
 – Film in the Fridge

  111. 72
    Kristin says:

    My daughter has been requesting, bugging really, that i teach her to quilt. We started with your tutorial. While she ended up getting tired after 4 blocks, we came up with a creative solution, her school bag. Check out her tote here. http://thecraftyquilter.blogspot.com/2010_08_01_archive.html#8103312914287884292
    Thanks for your inspiration!

  112. Pingback: Turkey Attacked in Tractor, First Quilt Block Using String Quilt and Anna Maria Horner Fabric | Twwly.com

  113. Pingback: Patchwork Cards tutorial « PioneerValleyGirl

  114. Pingback: hopefully something rhetorical » Blog Archive » Quilting Bee Update

Leave a Reply

Your email address will not be published. Required fields are marked *

*

You may use these HTML tags and attributes: <a href="" title=""> <abbr title=""> <acronym title=""> <b> <blockquote cite=""> <cite> <code> <del datetime=""> <em> <i> <q cite=""> <strike> <strong>